# BetterDSPControl
**A modern, phone-friendly control app for the t.racks DSP 204 and DSP 408 loudspeaker processors.**
Control all your DSPs at the same time from a phone, tablet or computer, over the network or USB.
> [!WARNING]
> **Vibe-coded, read this first.** I'm a hobbyist and wrote this app almost entirely with an AI coding assistant,
> for my own DSPs. It works for me, but large parts have only been tested against a simulator, and some protocol
> details are educated guesses (see [Verified vs. unverified](CLAUDE.md#verified-vs-unverified)).
> It talks directly to your loudspeaker processor and can change gains, limiters and crossovers: a wrong value can
> be loud and can damage speakers. **Export a preset before you start, keep the volume down while trying things out,
> and don't use it on a show you can't afford to lose.**
> You use it entirely at your own risk. I'm not responsible for anything that happens to your DSP, your speakers,
> your ears, your gig or your neighbours, nor for anything else, should the sky fall on you while you use it.
> No warranty of any kind (see [LICENSE](LICENSE)).
> **Unofficial project.** BetterDSPControl is an independent open-source project. It is not affiliated with,
> endorsed by or supported by Musikhaus Thomann or the t.racks brand. "Thomann" and "t.racks" are trademarks of
> their respective owner and are used here only to name the devices this software works with.
> See [Disclaimer](#disclaimer).
* Runs on Windows, macOS, Linux and a Raspberry Pi, and in any browser
* No packages to install for the server (Python 3.10+ standard library), no build tools for the web UI
* English and German user interface
* **Want to look around first?** ⚙ → *Demo mode* starts a simulated DSP inside the app. Nothing is sent to real devices
All screenshots show the built-in simulator with made-up settings.
## What it can do
### Mixer
Faders, mute and live meters for every input and output, on all screens. **LIM** lights up when an output's limiter
acts, as reported by the DSP. Linked channels are grouped under a named bracket in their colour.
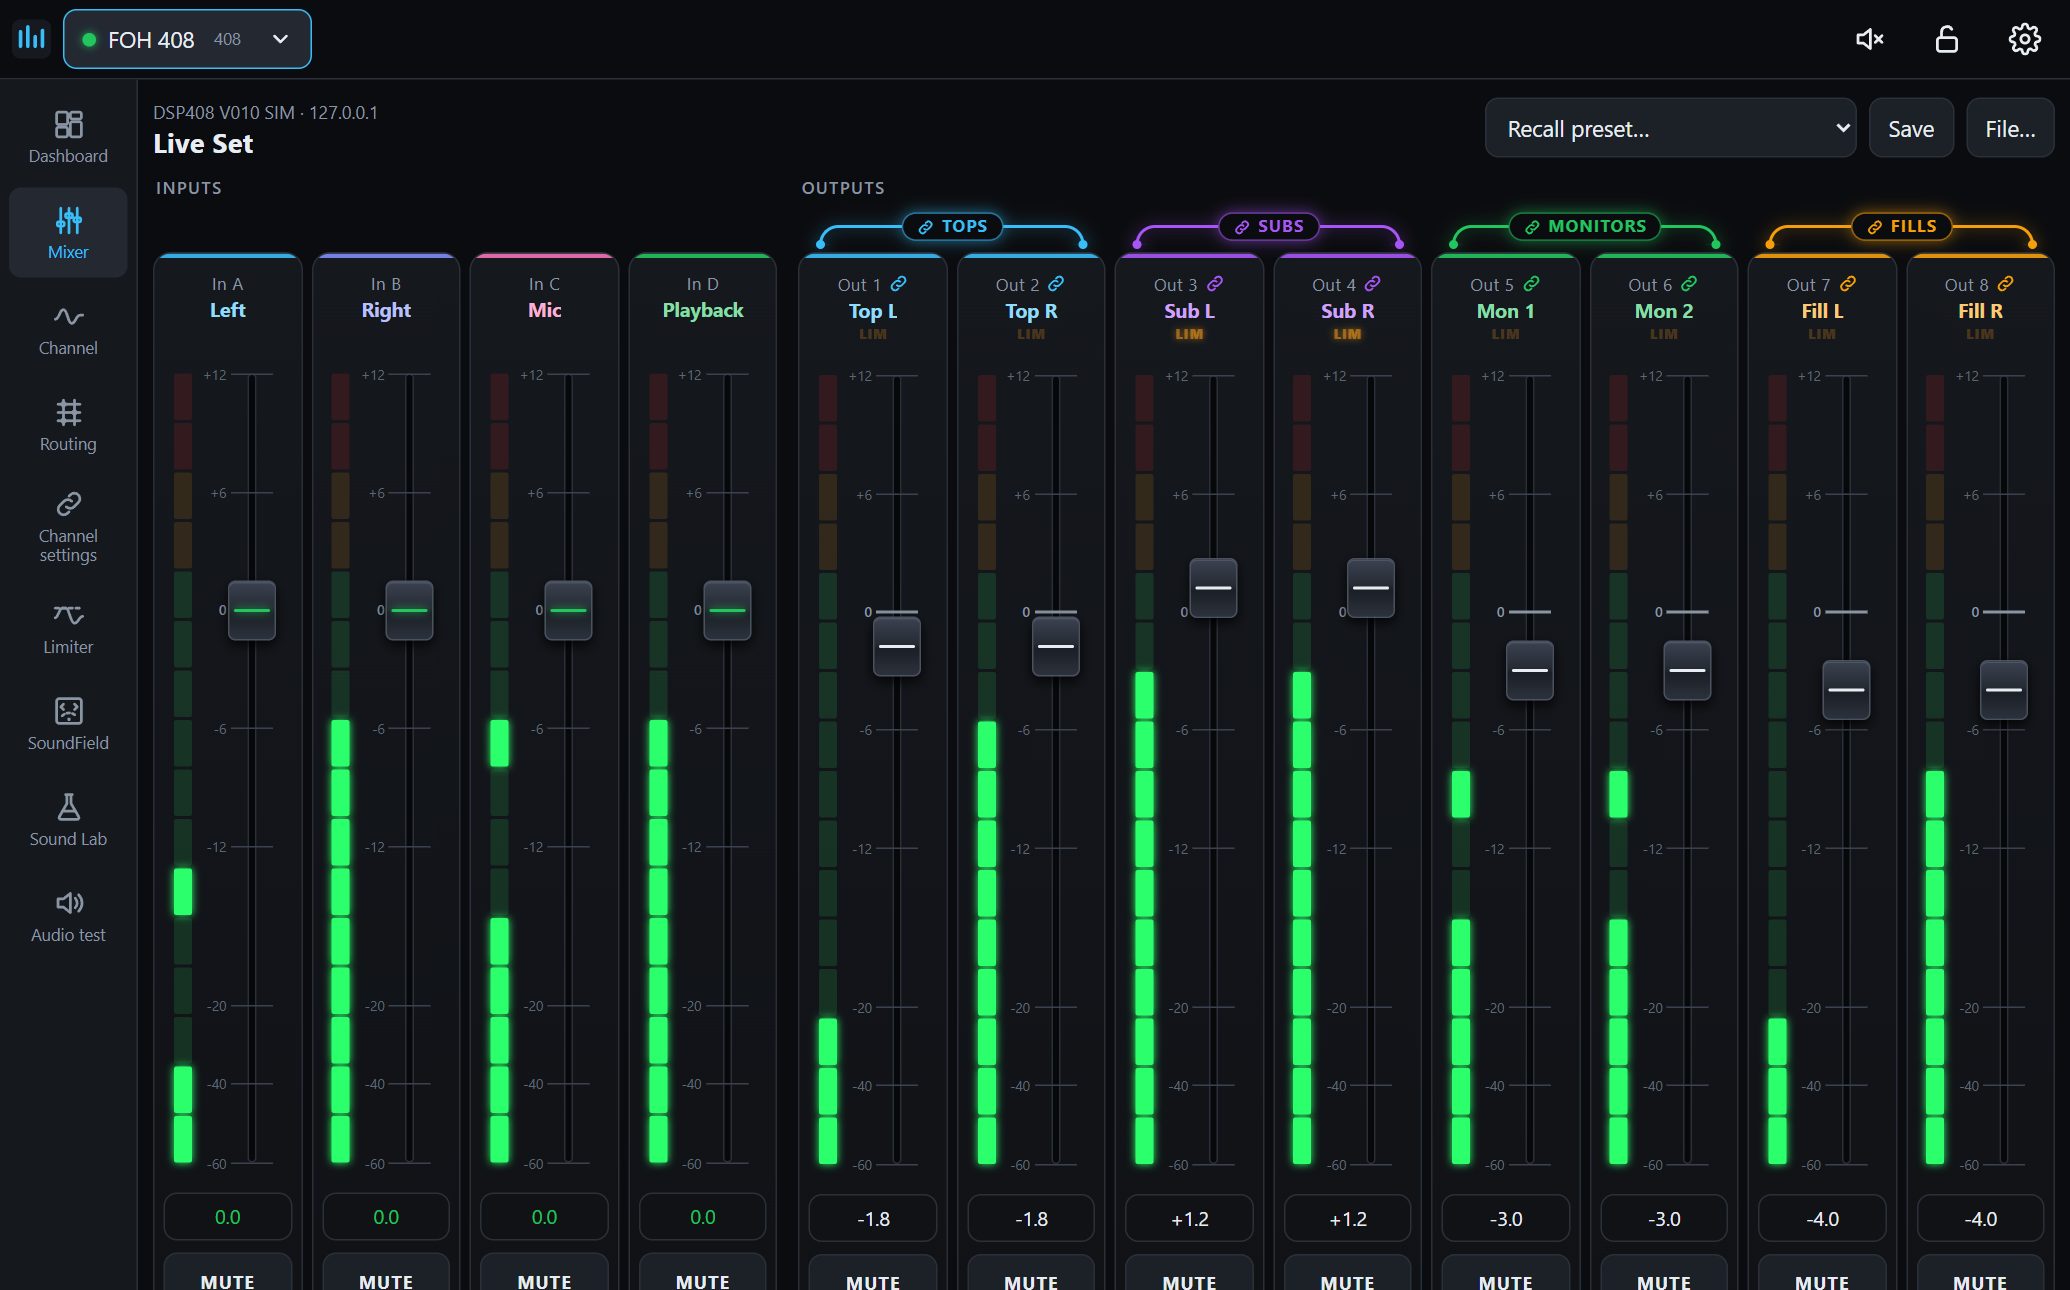
Tap a value to type it (`-3.5`, `1.2k`, a delay in metres like `2.5m`). Faders snap at 0 dB and a double tap returns
to 0 dB. **Mute all** silences every channel of every connected DSP, and releasing it unmutes only what was open before.
### Channel and EQ
Drag the bands directly on the curve. The 8- or 9-band parametric EQ shows magnitude or phase, including crossover
filters, and can overlay any other channel, for example to line up a sub with a top.
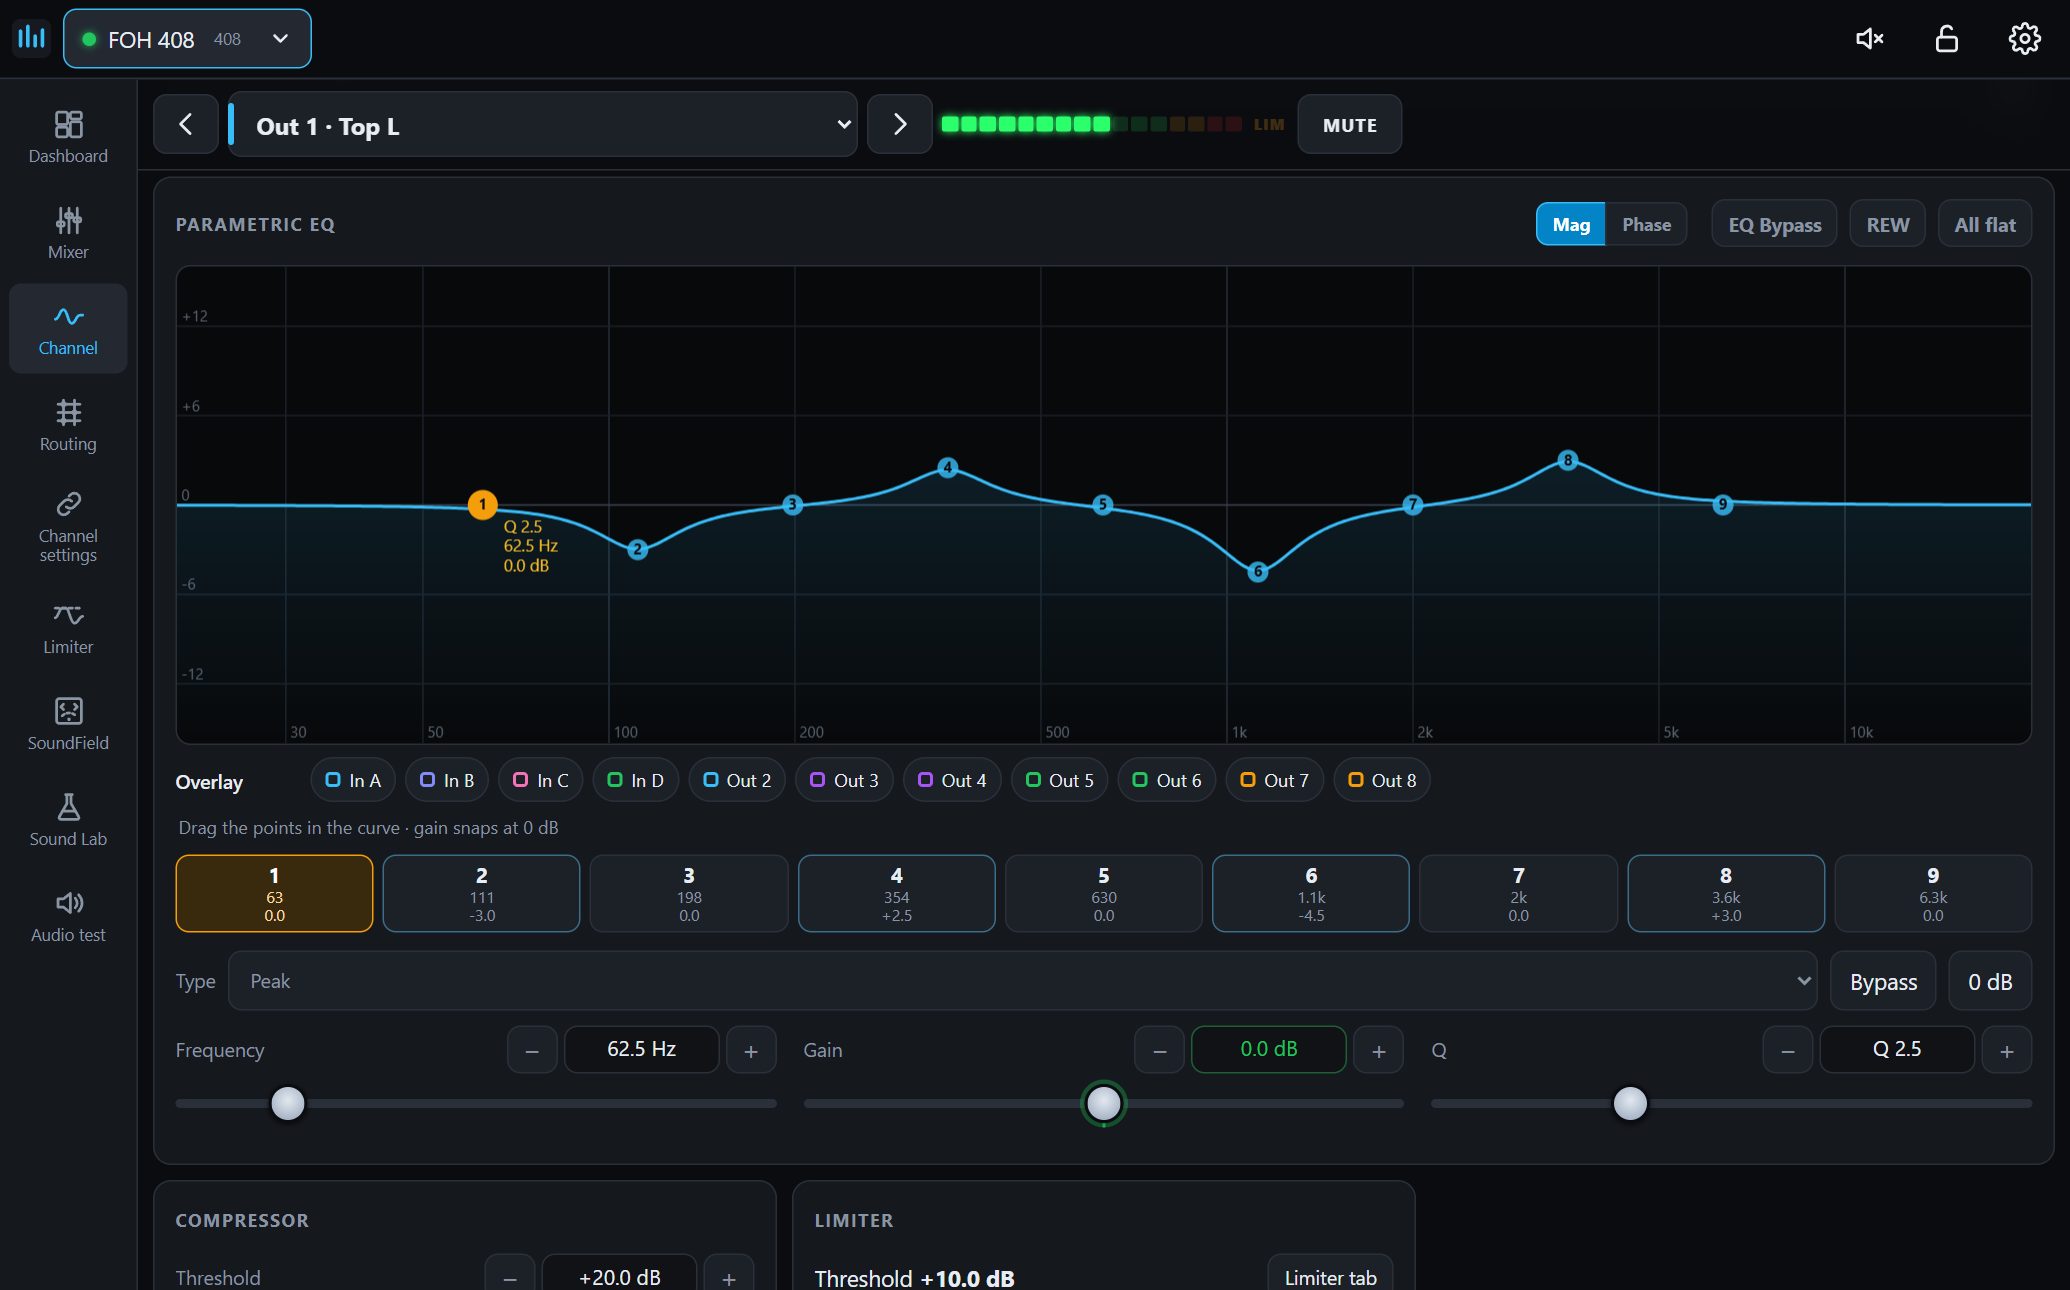
* Name, gain, delay, polarity, high and low pass, *EQ Bypass*
* Inputs: noise gate, 31-band graphic EQ
* Outputs: compressor, limiter, input routing with mix levels
* **Copy settings** from one channel to any number of channels, on all connected DSPs
### Routing
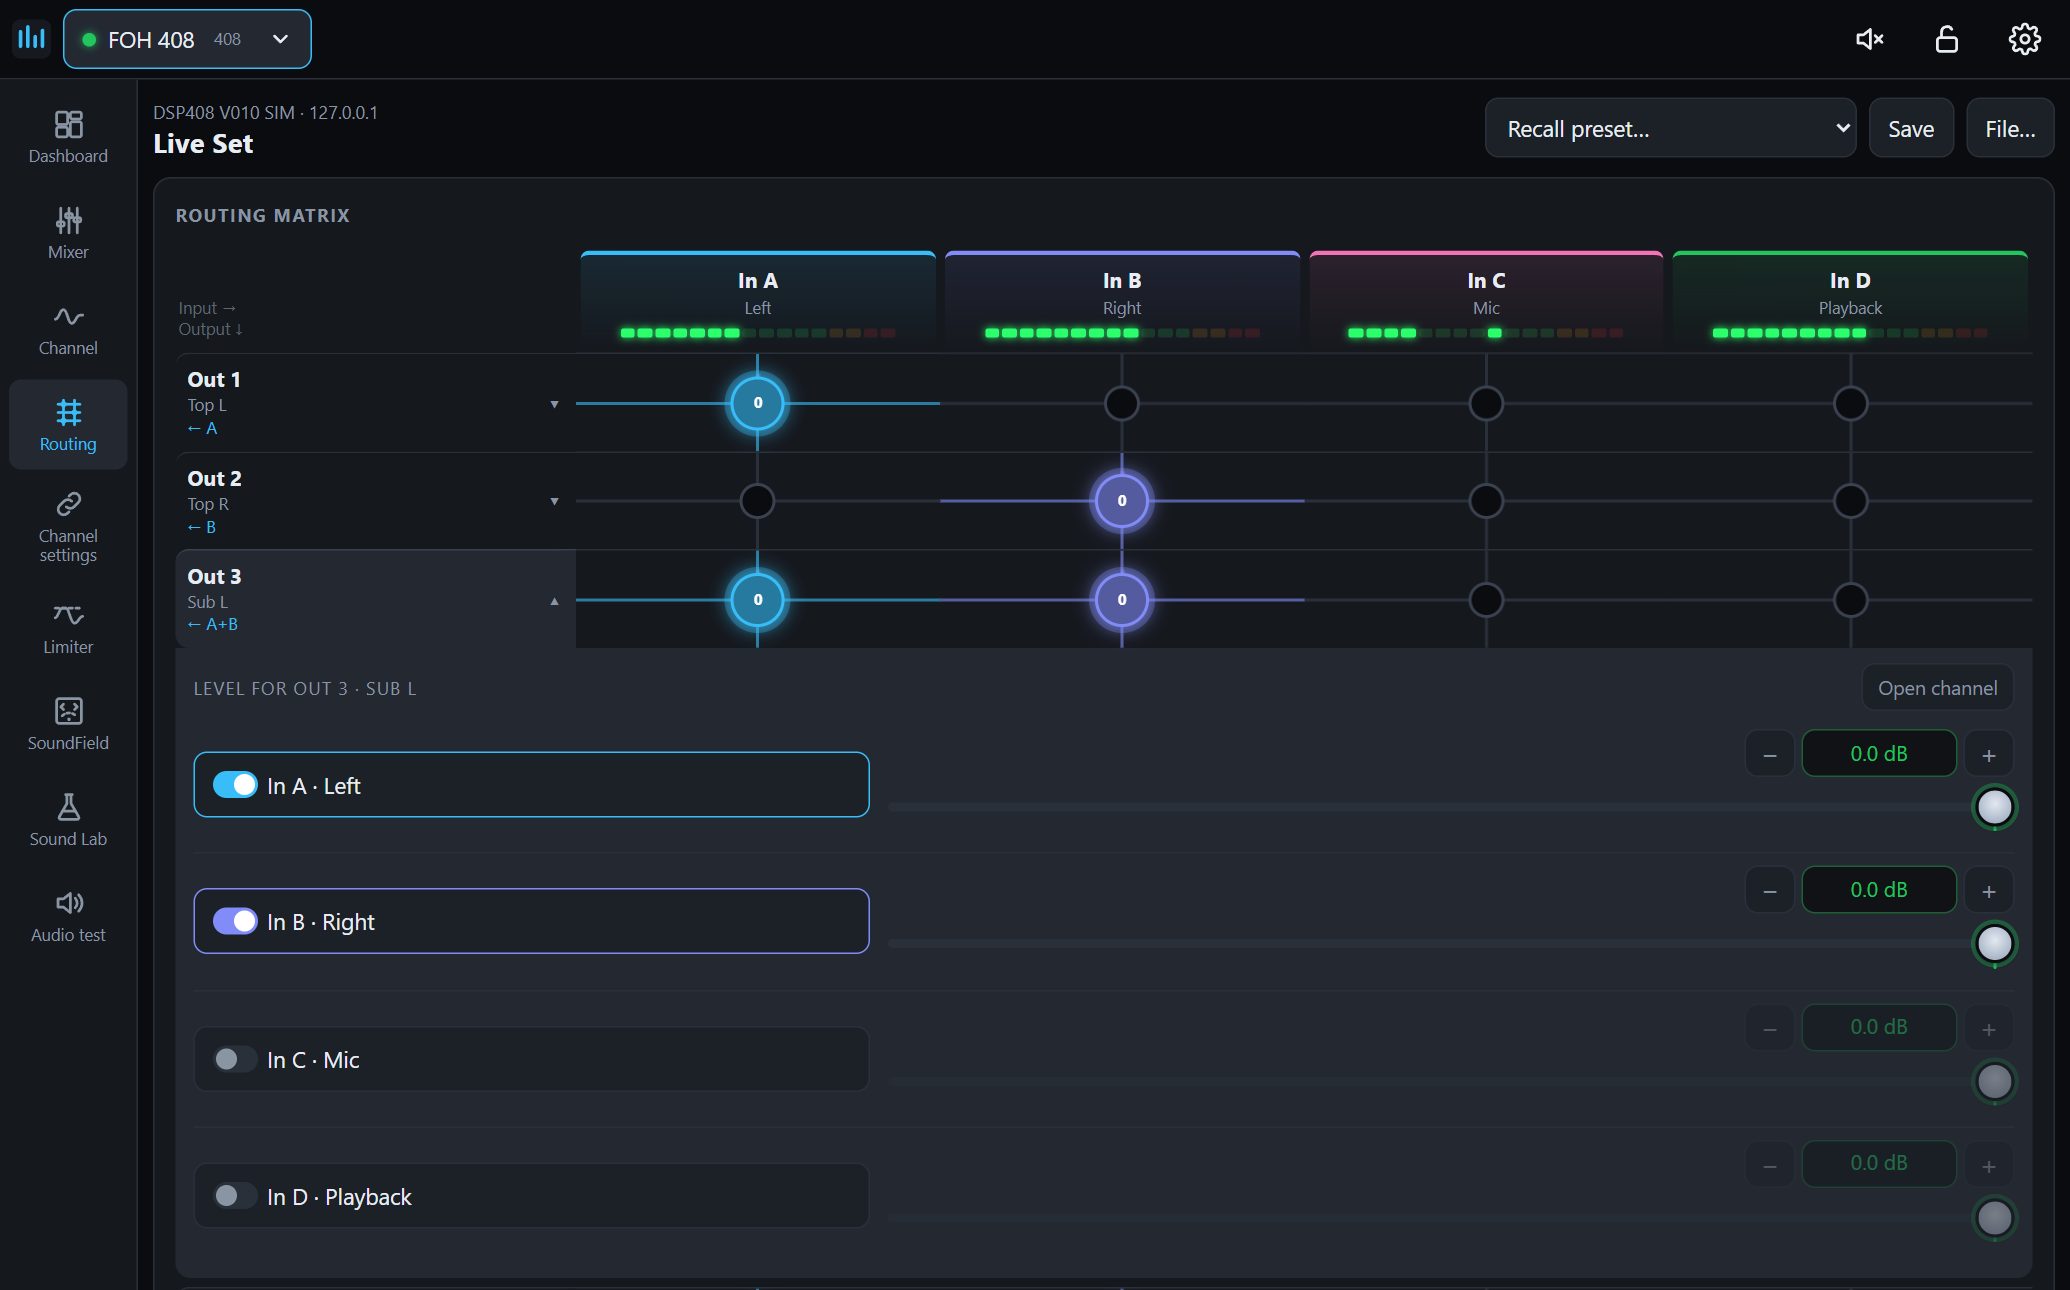
Connect inputs and outputs in a matrix. Each connection shows its level inside the crosspoint and follows the
slider as you move it.
### Link groups, colours and presets
Link channels into groups, so the DSP mirrors changes within a group. Give each group a name and a colour.
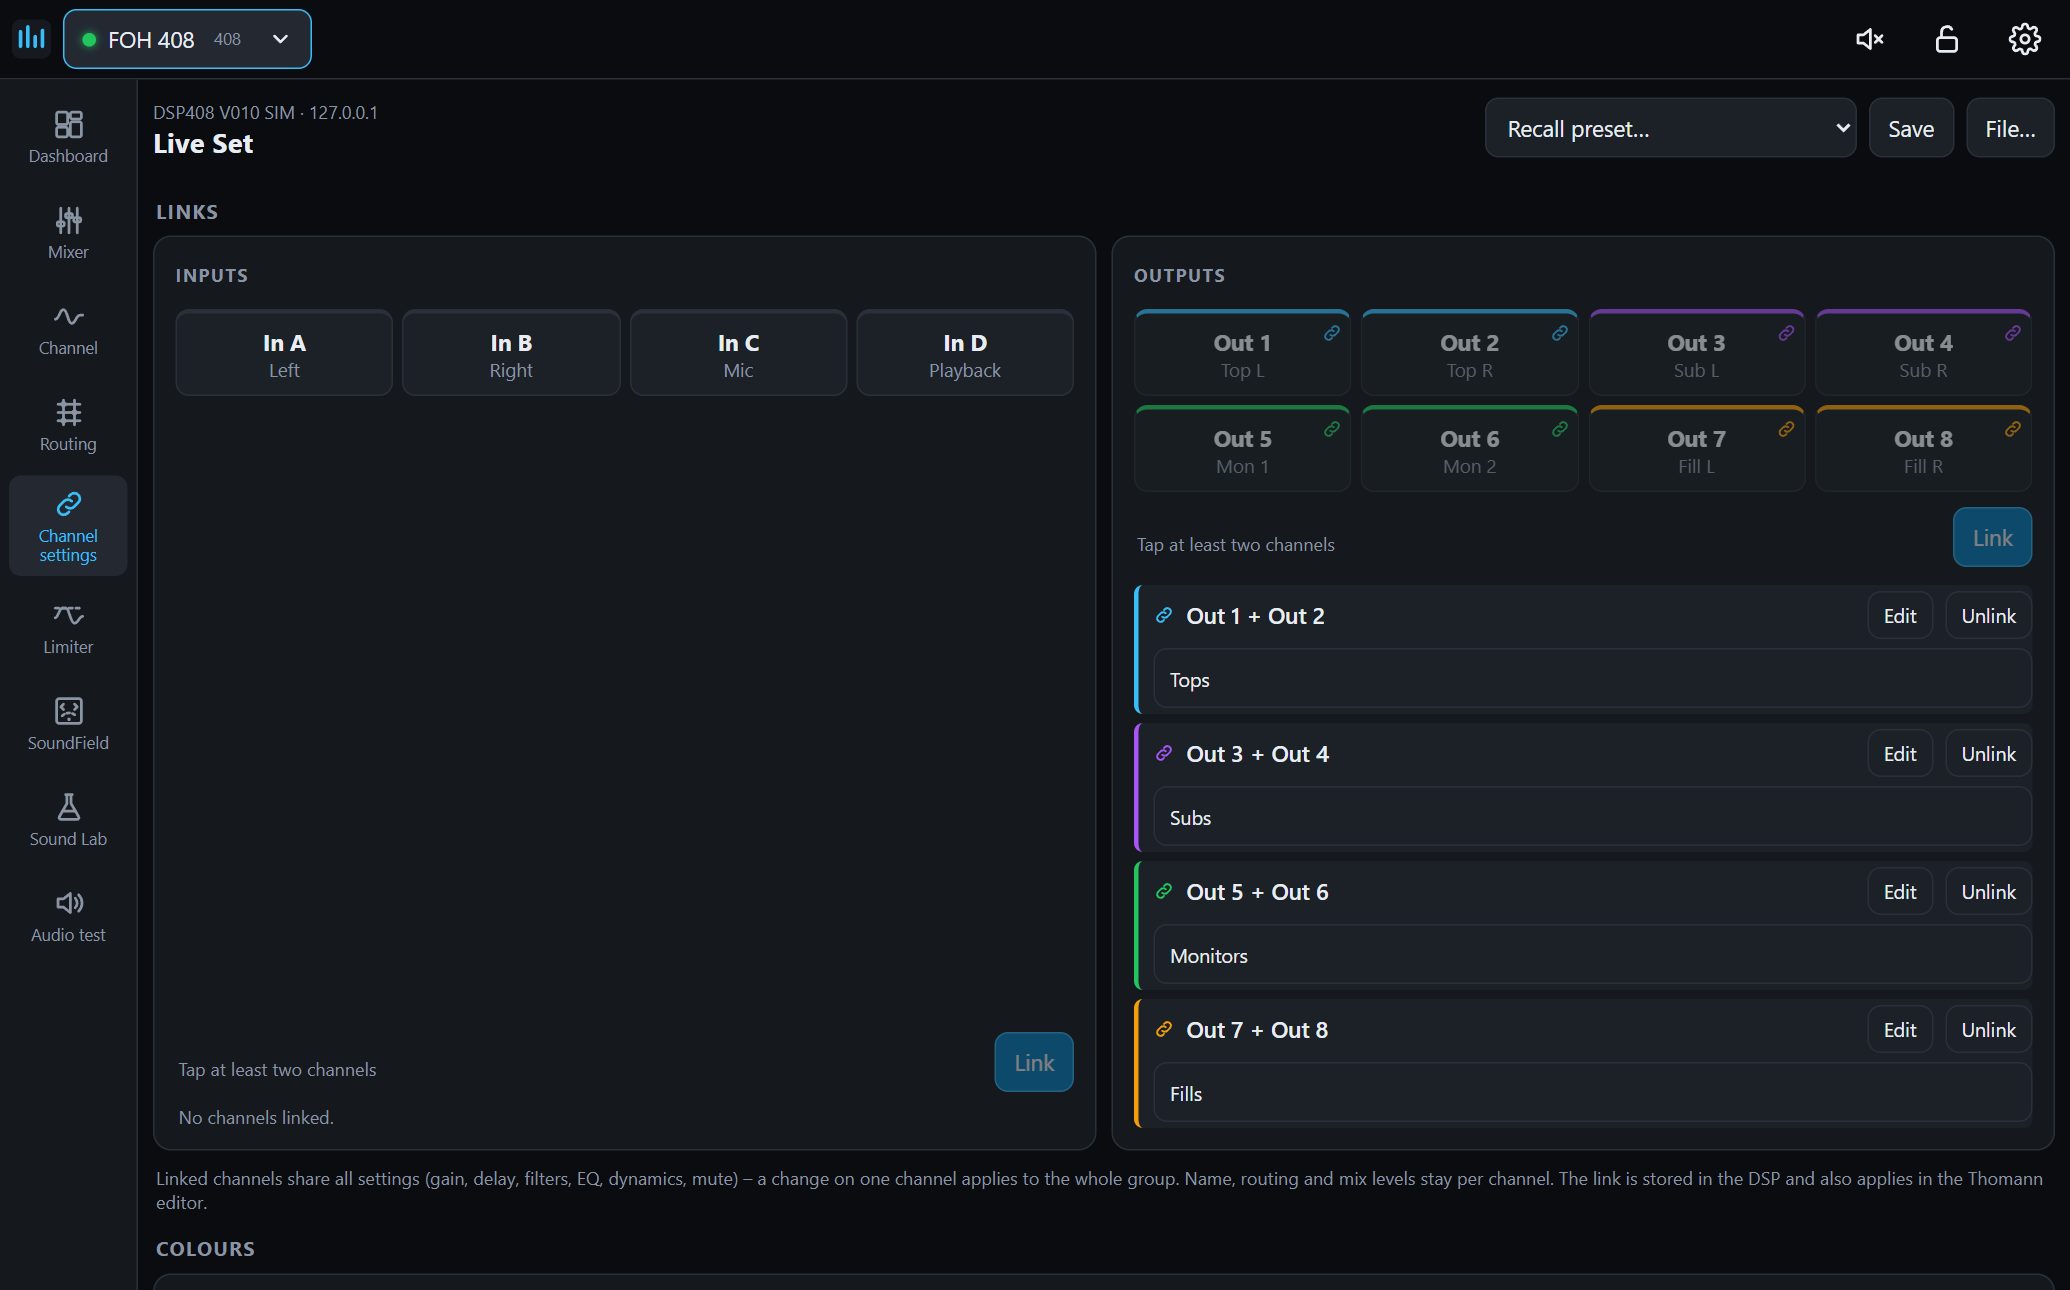
* **Colours and group names belong to the preset.** The DSP has no preset IDs, so they are kept by preset name: same
name, same look. A preset without its own look starts empty
* **Max level** per channel: a software lock, the fader can't go higher
* **Preset files:** export the current DSP state and import it again, colours and group names included. An import
only changes the active state, writes only what actually differs and makes a backup first (*Undo import*)
### Limiter calculator
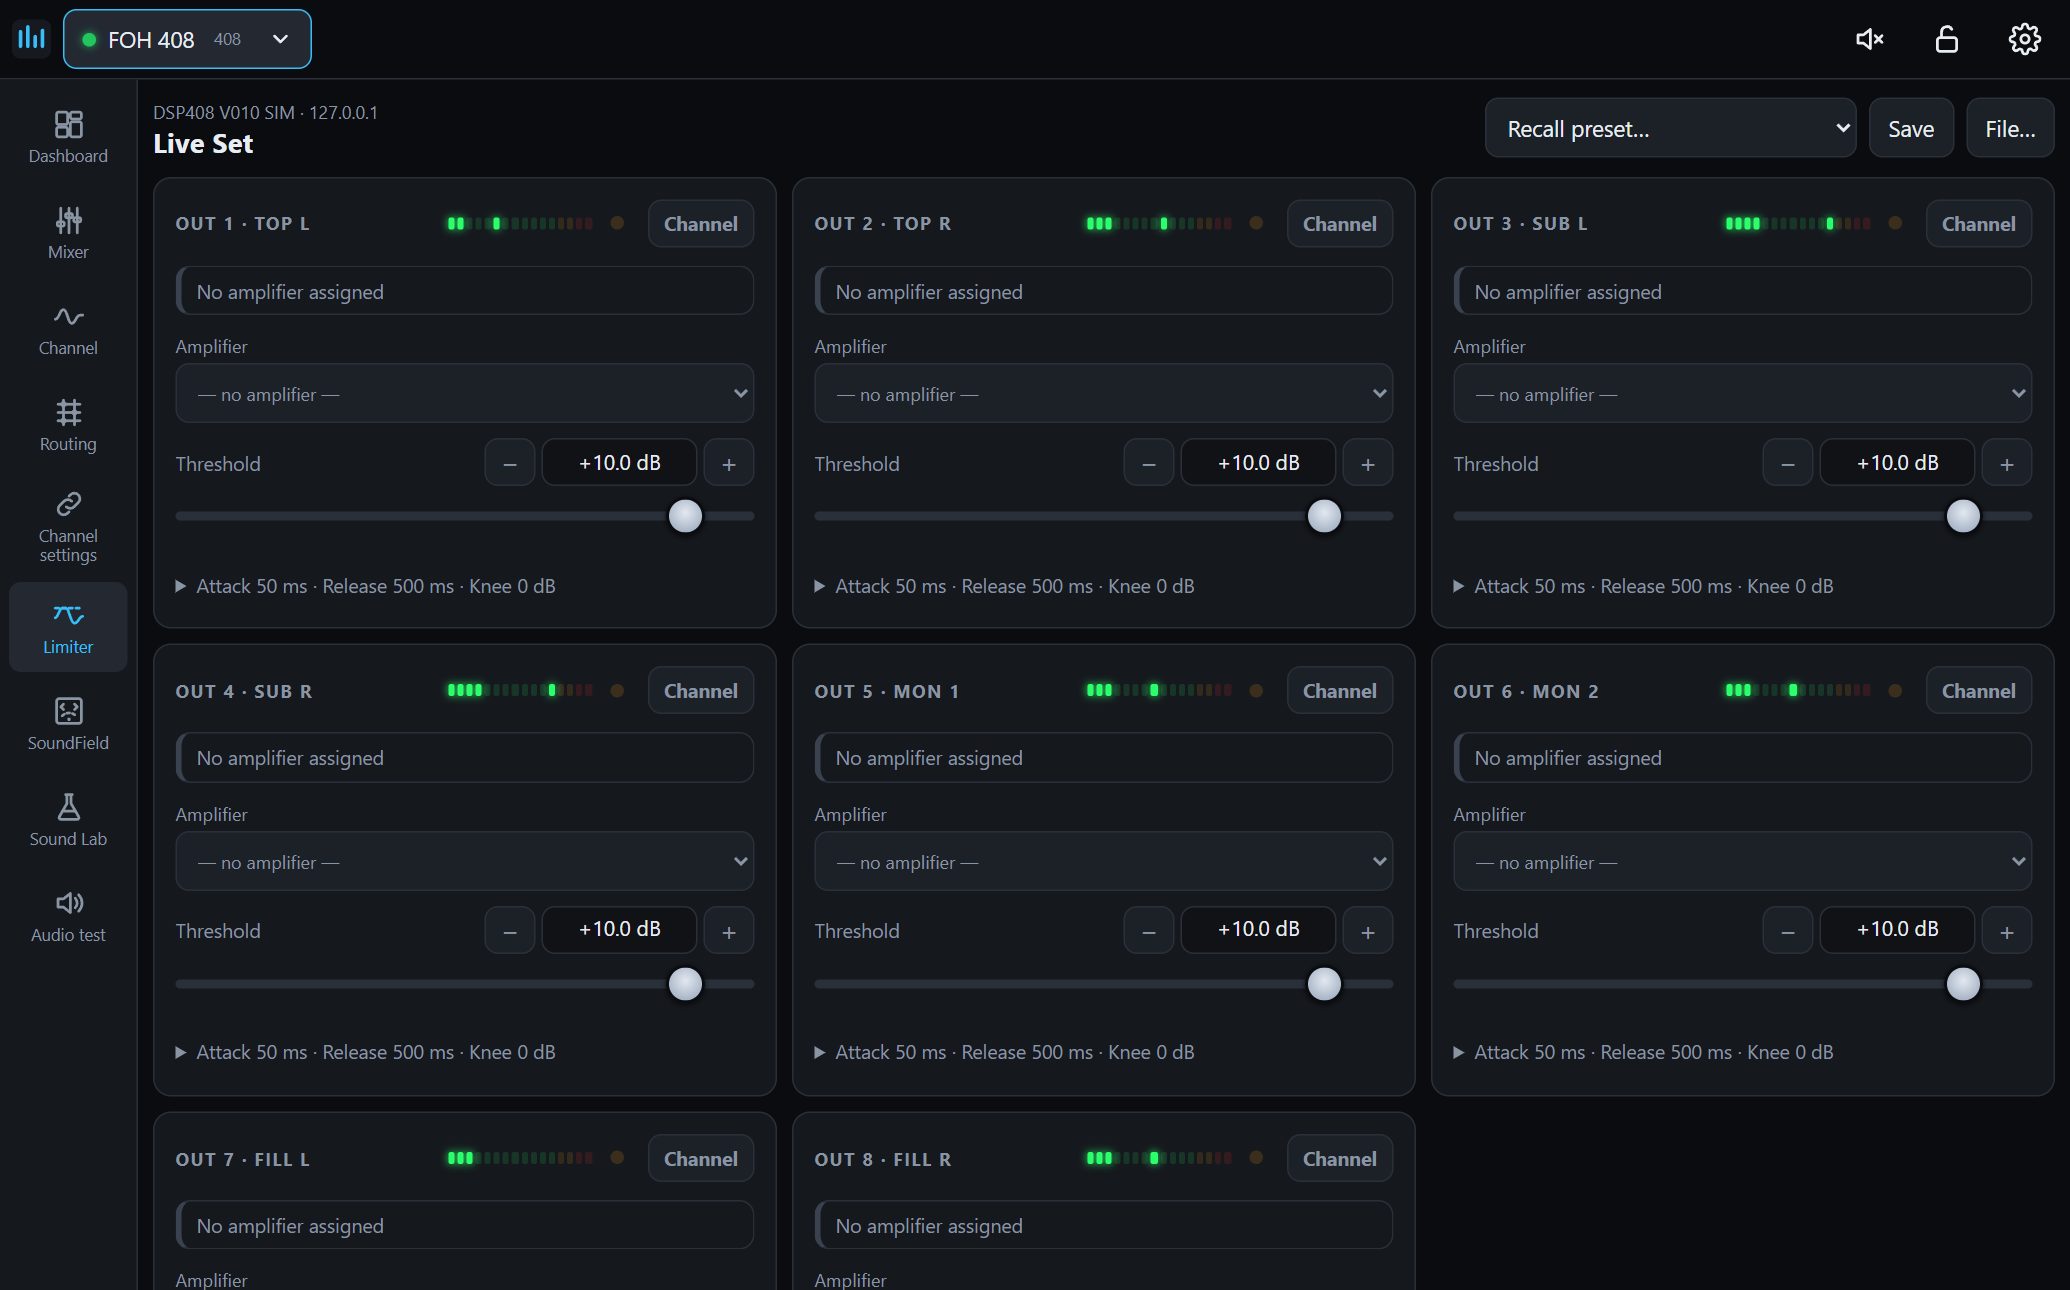
Enter your amplifiers' datasheet values (power at 8/4/2 Ω, sensitivity or gain), assign outputs and see the resulting
power when the limiter engages, the clipping headroom and the speaker load. *Limit to … W* calculates the threshold.
Attack and release presets per band (infra, sub, kick, mid, high). It is a planning aid based on an assumed reference
level, so verify it with a measurement.
### SoundField
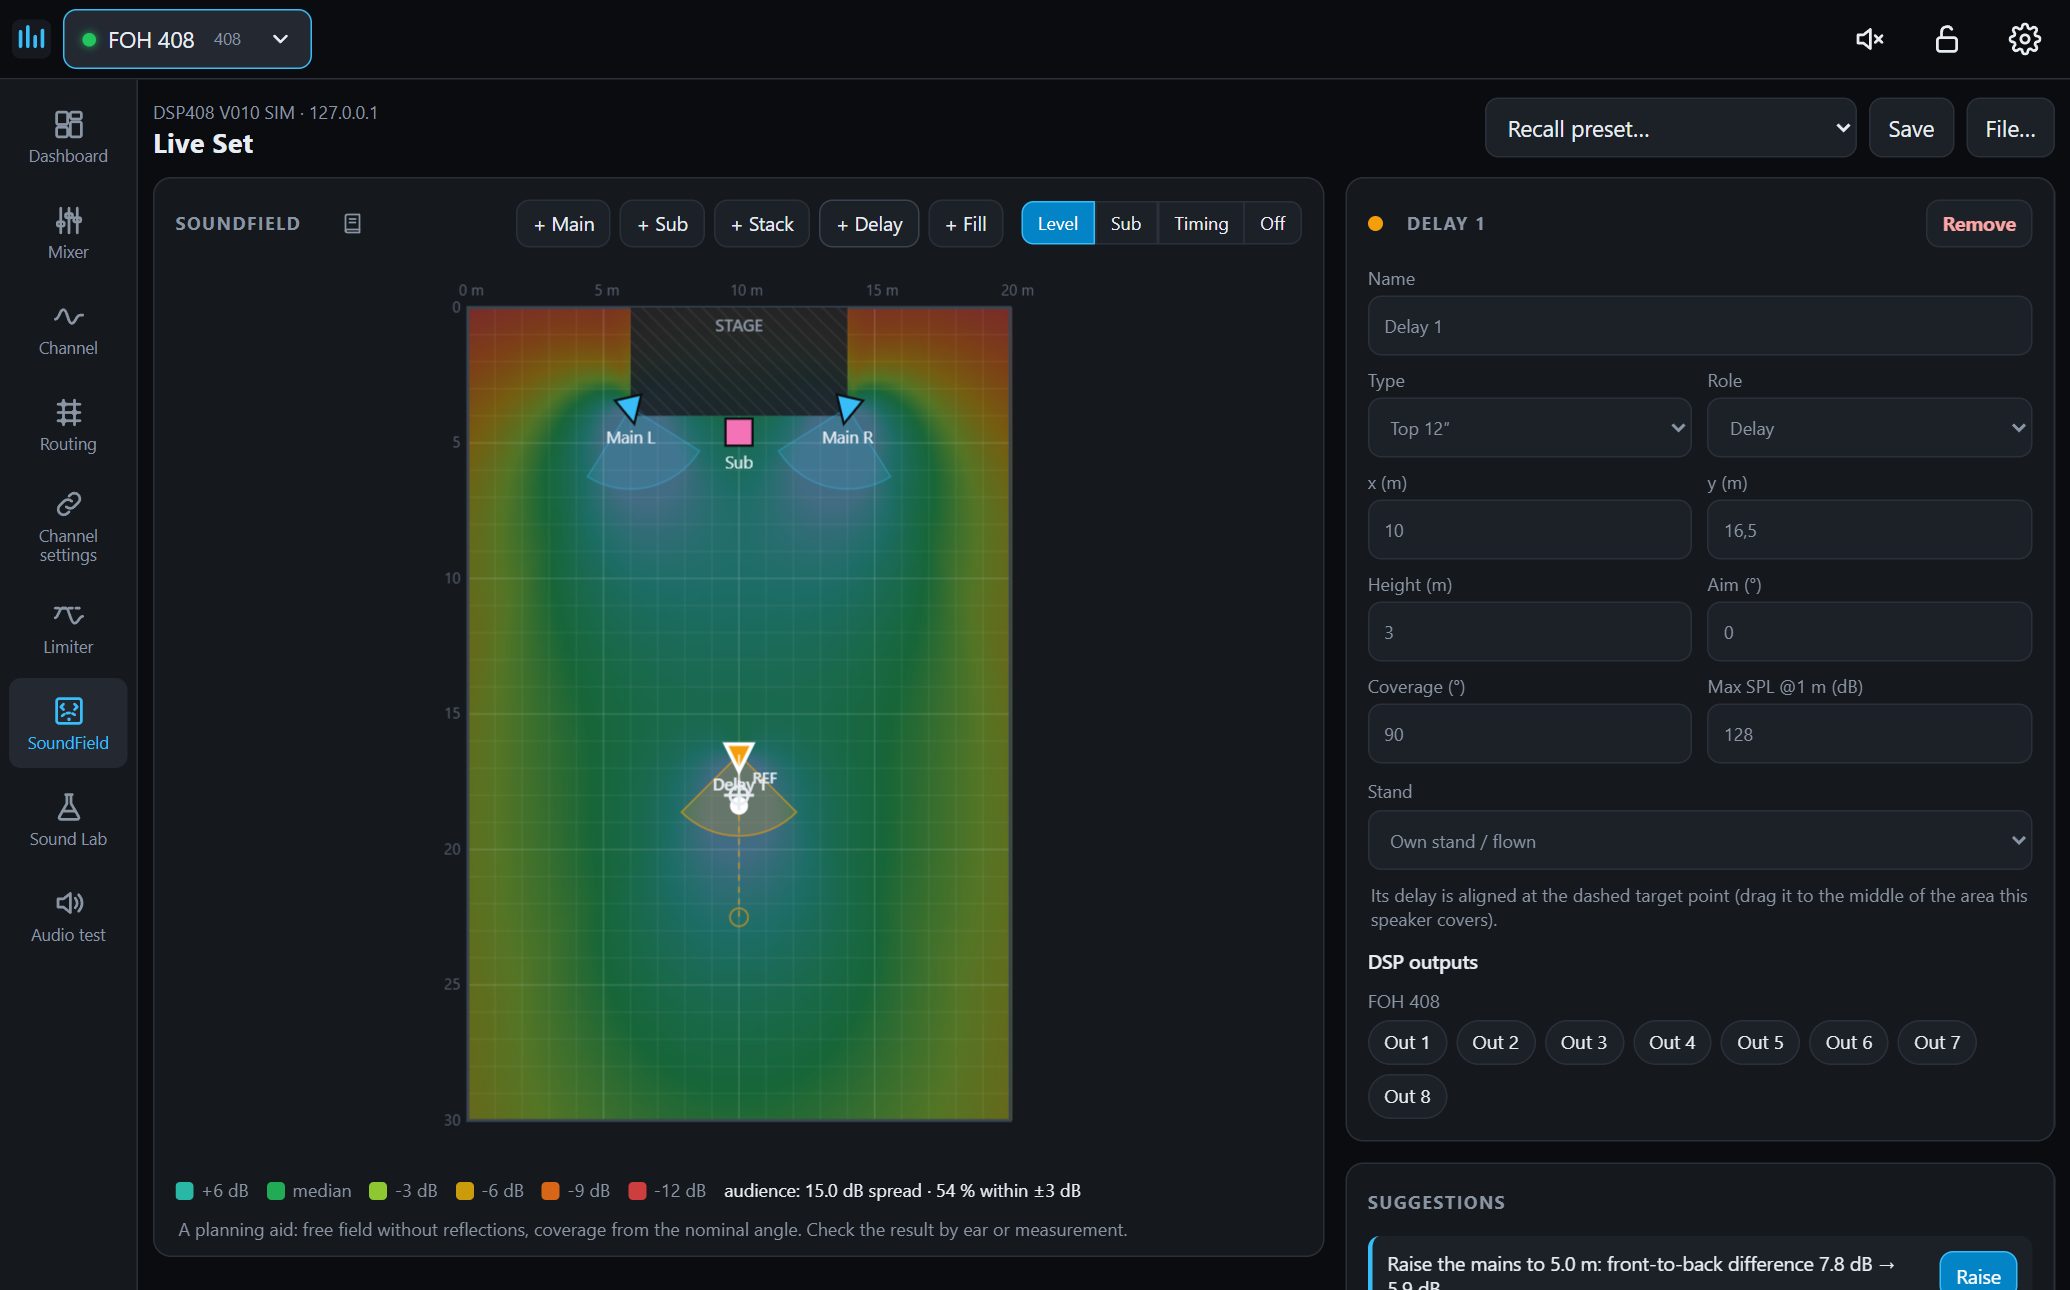
A top view of the room for planning. Place mains, subs, delays and fills by dragging, and see a level map, a sub map at
a chosen frequency with its cancellation lanes, and a timing map for delay speakers. It suggests aiming, height, delay
lines and sub placement, calculates the delays and writes them to the assigned DSP outputs. It is a free-field model
without reflections, so a planning aid and not a measurement. A handbook with real cases is built in.
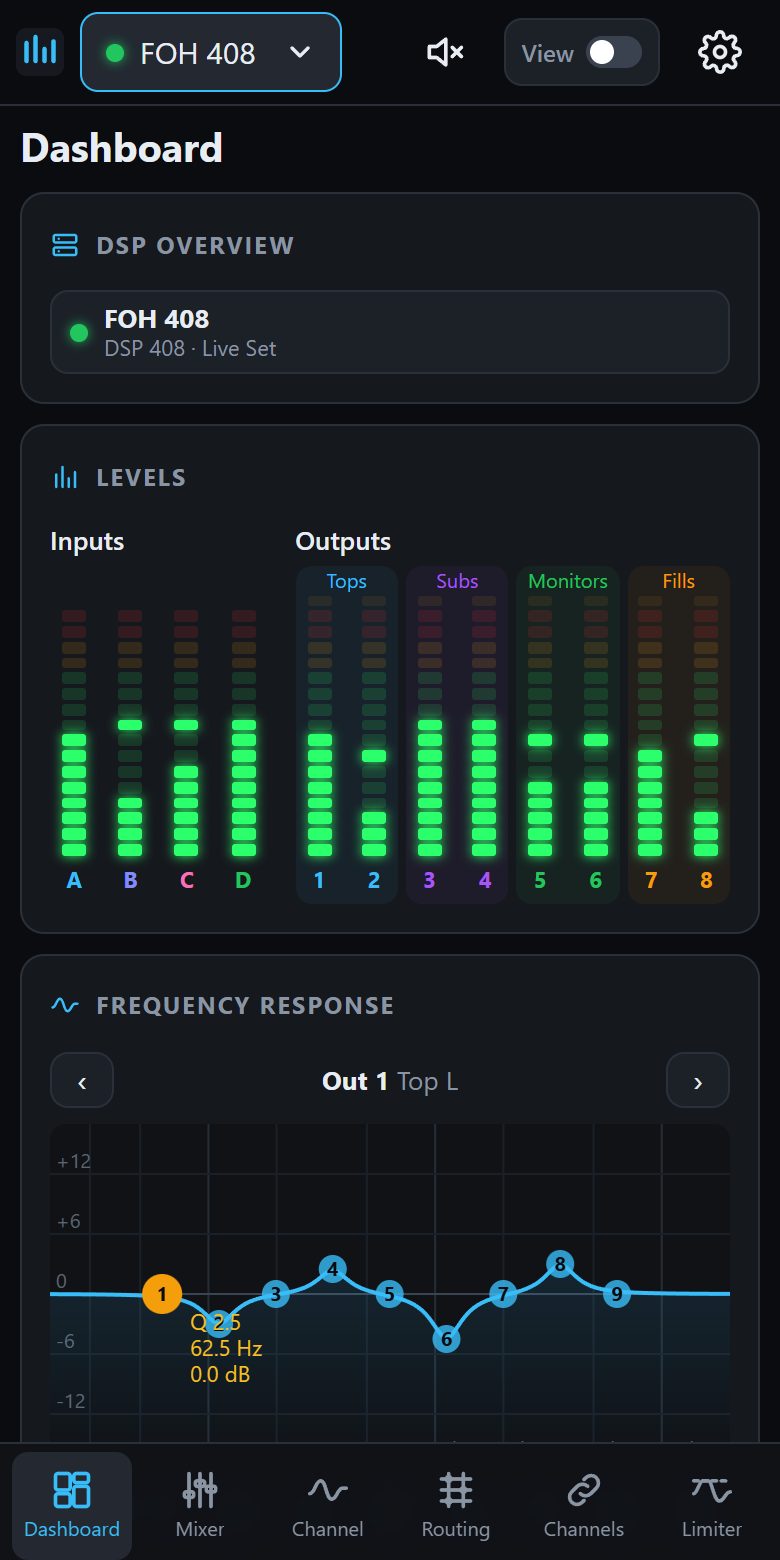
### Dashboard
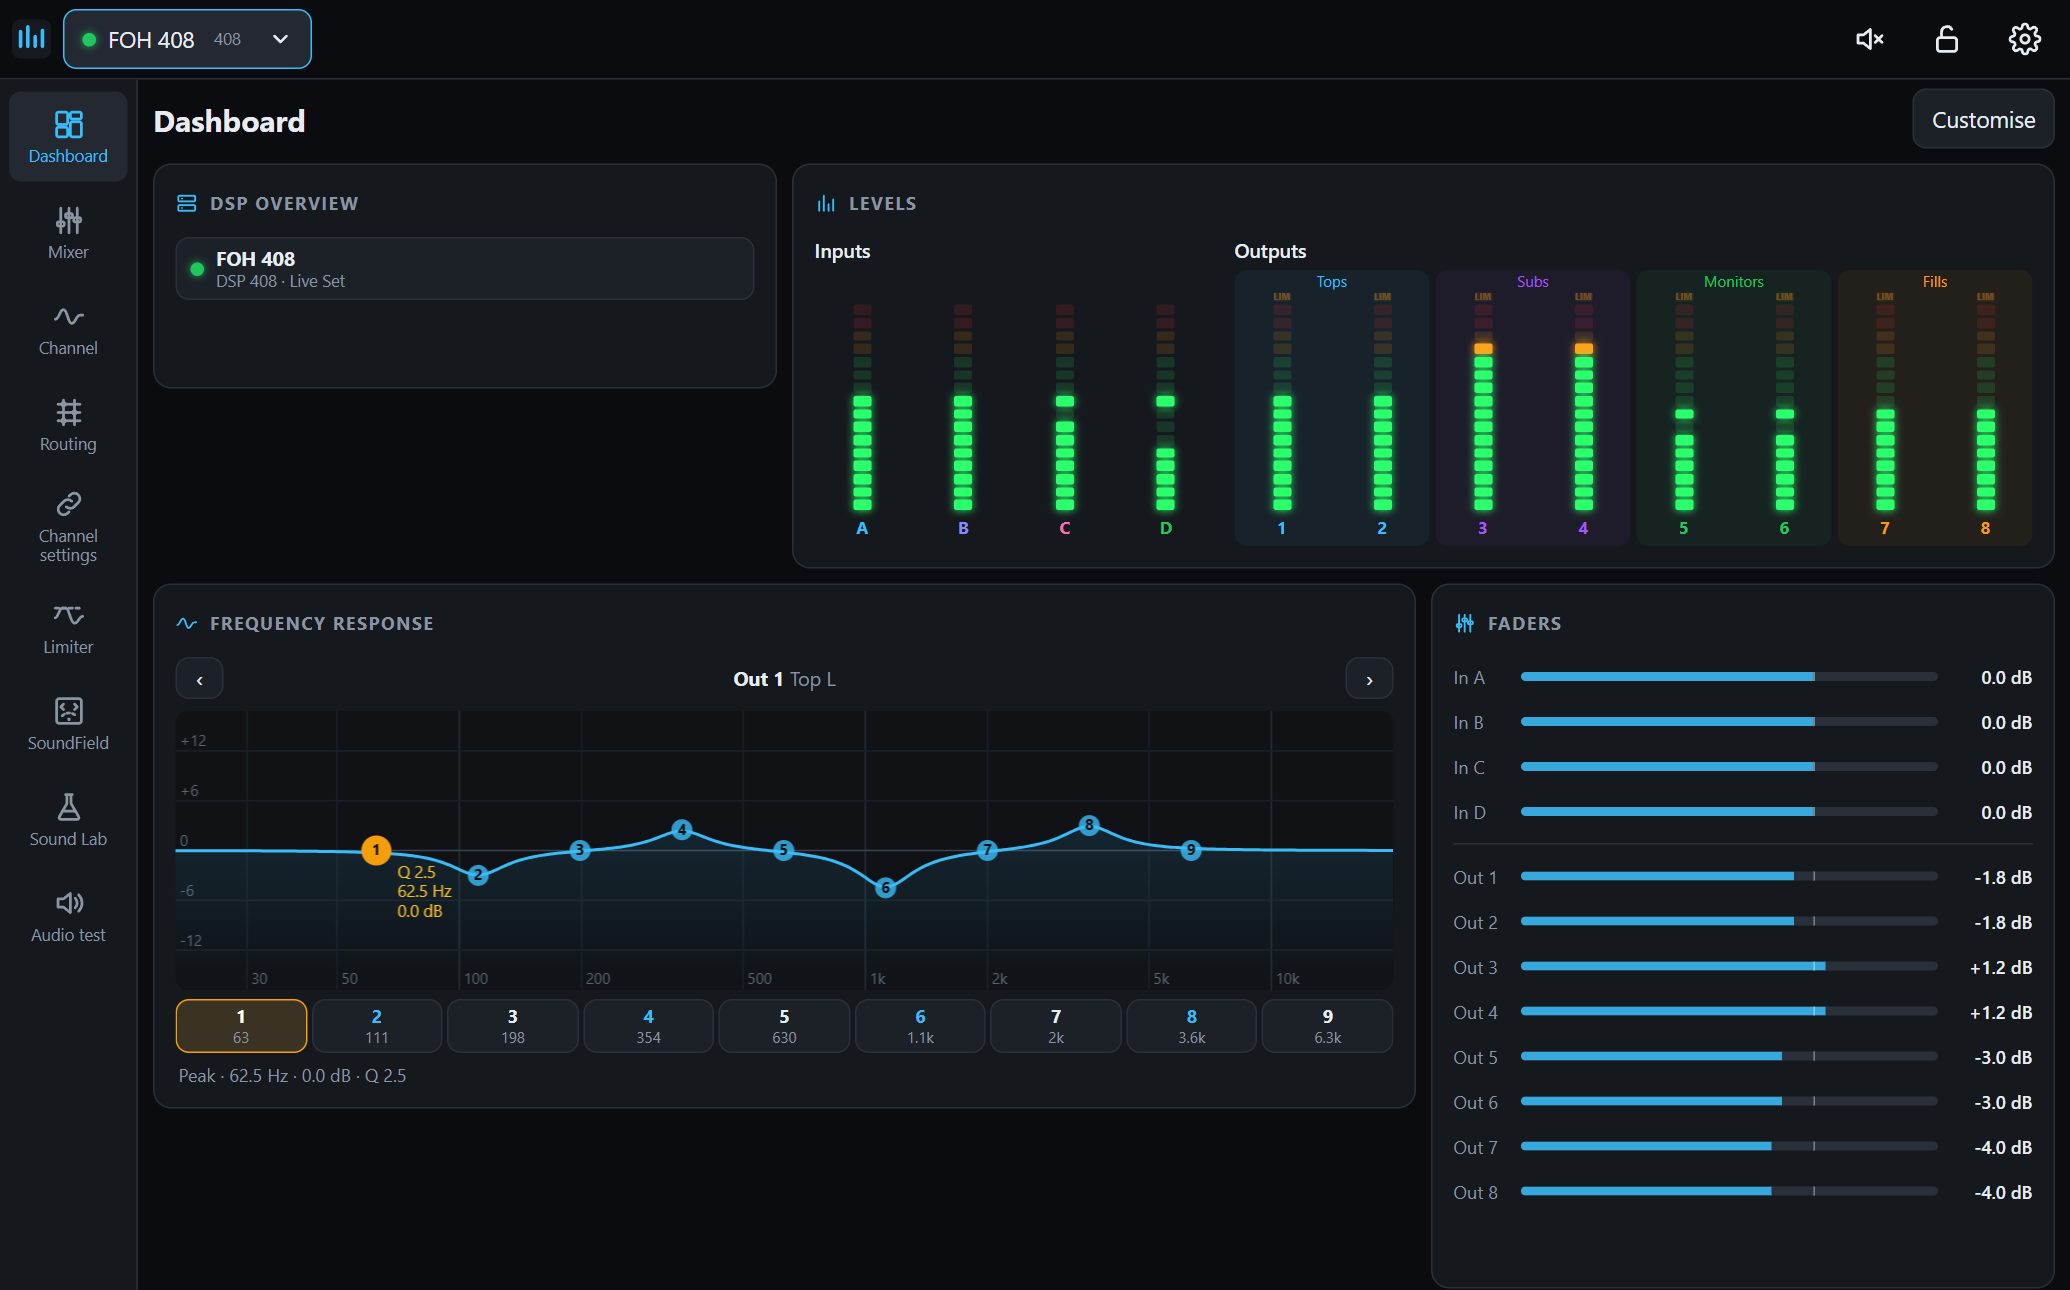
Your own overview page: DSP overview, levels, faders, frequency response, channel, limiter, routing, delay, notes. Drag
modules on with a mouse, then move and resize them. It only looks and never changes a DSP. On touchscreens only the
settings of each module can be changed. The dashboard starts empty.
### DJ Brake
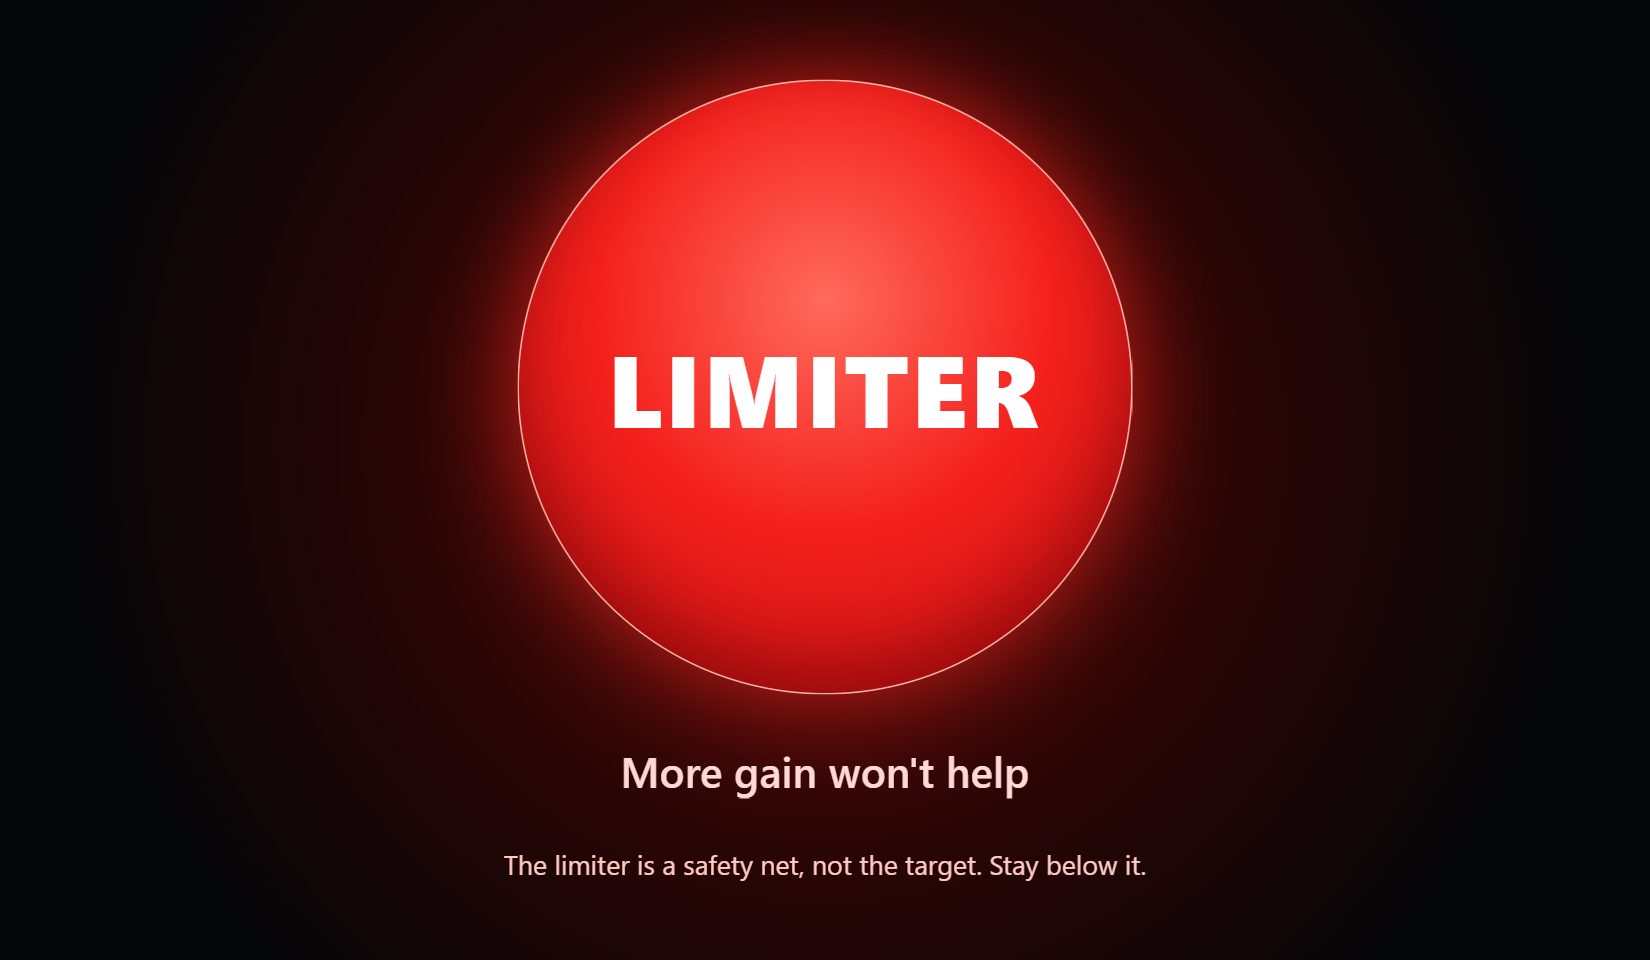
An optional page at `/djbrake` for a tablet at the DJ booth: a big red light when a limiter acts, on for one more second
afterwards. Limiters that don't matter, a monitor for example, can be left out. It needs no PIN, shows nothing else
and changes nothing. Turn it on under ⚙ → *Remote access* in the desktop apps, or ⚙ → *Security* on the web. In the
desktop apps it needs remote access to be on. The limiter signal comes from the DSP, and on a real DSP 204 it was seen
staying on for up to 4 seconds in some cases, so the light can stay on longer than that one second.
 ### On your phone
The whole app adapts to phones and tablets. The web UI starts **read-only** on touch devices, and a small switch at the
top allows changes, so nothing moves by accident. Zooming is turned off so it can't get in the way of the faders. Every
change is pushed live to all connected devices.
 ### And also
* **Several DSPs at once:** pick one at the top, the model is detected automatically
* **Network search** finds DSPs in the local network and adds them with one click
* **Sound Lab** (desktop apps only): works with [REW](https://www.roomeqwizard.com/). Take the filters of a measurement or
a REW filter file onto a channel, compare before applying, send a channel's curve back. So far only tested against a
stand-in built from REW's API description, not against REW itself
* **Audio test:** the DSP's generator (pink noise, white noise, sine). All outputs drop to −50 dB first and one test
fader raises them together
* **Device lock:** DSPs locked with their 4-character code are detected and the app asks for the code
* **Settings backup** in one file, and in the desktop apps **Reset app settings**. The DSPs are disconnected first and
nothing on them changes
* **Your own logo** at the top left and as the browser icon
## Supported hardware
| Device | Network | USB | Tested on real hardware |
|--------|---------|-----|-------------------------|
| t.racks DSP 204 | ✓ | ✓ | yes (firmware V0104P, USB on macOS) |
| t.racks DSP 408 | ✓ | ✓ | not yet, frames match published captures |
| t.racks DSP 206 (beta) | ✓ | ? | no, assumed to work like the others, testers wanted |
| t.racks FIR DSP 408 (beta) | ✓ | ? | no, simulator only |
The FIR DSP 408 gets its own **FIR** tab: low-, high- and band-pass with window and taps on the outputs, coefficients
from a txt/csv file on inputs (up to 2048) and outputs (up to 1024), a curve and the shared budget of 4096 taps. Its
dynamic EQs are not supported.
Beta models are not detected automatically: choose them by hand when adding the device (amplifiers off for the first
test). If the shown values don't match the DSP, please send the file from File… → Export.
The DSPs accept only **one** connection at a time, so close any other control software first.
## Quick start (web UI)
```bash
git clone https://git.thiemoo.at/Givou/BetterDSPControl.git
```
```bash
cd BetterDSPControl
```
```bash
python server.py
```
Open `http://:8080` in a browser (from a phone: same Wi-Fi/LAN).
1. Log in with the default PIN **`1234`**.
2. Open ⚙ (settings), enter the IP addresses of your DSPs (or choose *USB cable*) and press *Connect*.
3. **Change the PIN** under ⚙ → Security.
4. Switch the language under ⚙ → *Language / Sprache* (English is the default).
`config.json` is created on the first start. Options: `--port 8080`, `--host 0.0.0.0`, `--config path/to/config.json`,
`-v` (debug log). On Windows you can also double-click `start.bat`.
**Forgot the PIN?** Stop the server, delete the `auth` entry from `config.json` and start again. The PIN is `1234`
again.
### Security
The PIN protects against accidental access in your own network, nothing more: it has 4 digits, a logged-in device
stays logged in for 30 days, and after 5 wrong attempts the login is blocked (30 s, growing up to 15 min). The server speaks
plain HTTP. **Do not expose it to the internet** (no port forwarding); use a VPN if you need remote access.
## Desktop apps (Windows, macOS)
The desktop app runs the server and the UI in its own window, with **no PIN needed** in the app window.
Under ⚙ → *Remote access* you can turn on a web server for phones and tablets (port selectable); other devices
then log in with the PIN. The lock icon (top right) locks the app window (view only); unlock with the PIN.
Build it yourself (pre-built binaries are not part of the repository):
```bash
python -m pip install pyinstaller pywebview pillow
```
```bash
python packaging/build.py
```
* **Windows** → `dist/DSP Control.exe` and `dist/DSP Control Pi Writer.exe`. Data: `%APPDATA%\DSP Control`.
* **macOS** → `dist/DSP Control.app` and `dist/DSP Control.dmg` (use a venv with Python 3.10+, e.g. from Homebrew).
The app is not signed: on the first start right-click → *Open*. Data: `~/Library/Application Support/DSP Control`.
## Raspberry Pi (always-on web UI)
`DSP Control Pi Writer.exe` (Windows, user interface currently German only) prepares an SD card for a Raspberry Pi
(Pi 1/2/3/4/5, Zero, Zero 2 W) that serves the web UI permanently:
* downloads the current Raspberry Pi OS Lite from the official Raspberry Pi servers (with checksum, cached)
* writes and verifies the card, then configures it via cloud-init: hostname, Wi-Fi, user/SSH, web UI PIN, DSP IPs
* installs BetterDSPControl from the card (the Pi needs no internet), as a systemd service on port 80
After 2–5 minutes open `http://.local`. Needs administrator rights; only USB/SD drives that are not the
system or boot disk are offered. If Windows then asks to format the Linux partition, click **Cancel**. Writing to a real
SD card and the first boot on a real Pi have not been tested yet.
On any other Linux machine: `python3 server.py --port 8080`. For USB access as a normal user add a udev rule for
`hidraw` devices with VID `0168` / PID `0821` (see `INSTALL_SH` in `pi_image.py`).
## USB
Choose *USB cable* for a device under ⚙. The DSPs are USB HID devices (VID 0168 / PID 0821), so no driver is needed, and
they speak the same frames as over the network. Written for Windows (hid.dll), macOS (IOKit) and Linux (hidraw); tested
on a real DSP on macOS. With two DSPs on USB, pick the right one in the drop-down.
## Testing without hardware
The quickest way is the **demo mode** (⚙ → Demo mode). For development, a stand-alone simulator emulates both
models (`--lock A1BA` makes it ask for a lock code):
```bash
python sim.py --model 204 --port 9761
```
```bash
python sim.py --model 408 --port 9762
```
```bash
python server.py
```
Then add devices with IP `127.0.0.1` and ports 9761 / 9762 in the web UI. Self-test:
```bash
python tests/test_protocol.py
```
## Project layout
| Path | Contents |
|------|----------|
| `server.py` | Web server (HTTP + server-sent events), device management, auth, backups |
| `dsp/protocol.py` | Frame format, commands, value scales, memory-image parser |
| `dsp/device.py` | Client per DSP (TCP or USB): connect, command queue, meters, auto-reconnect, links |
| `dsp/preset.py` | Preset files: export/import, validation, import command sequence |
| `dsp/usbhid.py` | USB HID without extra packages (Windows hid.dll, macOS IOKit, Linux hidraw) |
| `sim.py` | Simulated DSP 204/408 |
| `desktop.py` | Desktop app (Windows/macOS): server + own window (pywebview) |
| `pi_writer.py`, `pi_image.py`, `win_disk.py` | Raspberry Pi SD card writer: GUI, OS image + cloud-init, raw disk writes |
| `static/` | Web UI: `app.js`, `dashboard.js`, `soundfield.js`, `rew.js`, handbooks in `docs.js`, translations in `i18n.js` |
| `packaging/` | Build script and icons |
| `tests/` | Self-tests |
| `tools/dsp_measure.py` | Measures on a real DSP how meter, gain, threshold and limiter relate |
| `docs/screenshots/` | The pictures in this file |
| `PROTOCOL.md` | Protocol documentation |
| `CLAUDE.md` | Guide for AI coding assistants (architecture, conventions, open points) |
## How to import into your Claude
This project was built with [Claude Code](https://claude.com/claude-code) and is documented so you can continue
working on it in your own Claude session. `CLAUDE.md` is read automatically by Claude Code and explains the
architecture, conventions and what is still unverified.
1. Clone the repository (see [Quick start](#quick-start-web-ui)).
2. Open the folder in Claude Code: either the **Claude desktop app** (tab *Code* → choose the folder) or in a
terminal:
```bash
cd BetterDSPControl && claude
```
3. Paste this prompt as your first message:
```text
This is BetterDSPControl, a control app for the t.racks DSP 204 / DSP 408 (Python stdlib server + vanilla JS web UI,
desktop app via pywebview, Raspberry Pi SD card writer).
Please get familiar with the project first:
1. Read CLAUDE.md, README.md and PROTOCOL.md completely.
2. Look at server.py, dsp/protocol.py, dsp/device.py and static/app.js to understand the structure.
3. Run the tests (python tests/test_protocol.py) and start the simulator test from the README
(sim.py for both models + server.py) to see the app working.
4. Summarise briefly how it is built and which points are still unverified on real hardware.
Rules: never change values on a real DSP permanently while testing (export a preset file first, use the simulator
whenever possible), keep the server free of third-party packages, and keep English and German texts in sync
(static/i18n.js). Ask me before pushing anything.
My devices: .
What I want to do: .
```
## Contributing
Issues and pull requests are welcome, especially test results from a real **DSP 408** and anything listed as unverified
in `CLAUDE.md`. Please test with the simulator first and run `python tests/test_protocol.py`. Owners of another model
can help a lot with `tools/dsp_measure.py`: it only lowers values, puts them back and writes a small result file.
## Disclaimer
This software talks to your audio hardware. Wrong settings (e.g. limiter thresholds, gain, crossover filters) can
damage loudspeakers or amplifiers. The limiter calculator is a planning aid based on datasheet values and an assumed
reference level, so verify with a measurement before relying on it. The software is provided "as is", without
warranty of any kind, see [LICENSE](LICENSE).
The protocol was documented for interoperability purposes only, by observing the communication of the devices and
testing on real hardware. This repository contains no code, binaries, firmware, images or documentation from the
manufacturer. Frame examples in the tests also match the DSP 408 captures published by
[dsp-408-ui](https://github.com/Aeternitaas/dsp-408-ui); no code from that project is used.
## License
[MIT](LICENSE) © 2026 Givou
The desktop builds bundle third-party components under their own licenses (Python – PSF License, pywebview – BSD,
pythonnet – MIT, PyInstaller bootloader – GPL with exception allowing distribution). If you distribute built
binaries, include their license notices.